Recent Posts

Can You Sublimate on Rayon Fabric? Dye Sub Tips on Poly, Spandex, Blends


Can you sublimate rayon or blends

Rayon. It’s finding it’s way into more and more shirts, pants and pillowcases.

That’s fine…. or is it?

In this article, we’ll talk about the shift to rayon and most importantly, how do we know if it’s right for our sublimation projects.

Why Most Rayon Doesn’t Hold Sublimation Well

Rayon is a semi-synthetic which could be produced with a variety of raw materials. While there are guidelines, the composition can vary which makes it a confusing topic for sublimation.

If you want a complete technical analysis of rayon, this site went the distance when it comes to explaining rayon.

Rayon Makeup

In short, rayon is made of so many things, none of which are known to accept ink dye sublimation.

It’s main ingredient is cellulose extracted from wood pulp, then cotton fibers and various amounts of chemicals.

BUT – when it’s blended with other materials, it could be used for sublimation, depending on the makeup of the fabric.

Will Cotton / Rayon / Spandex Blend Sublimate?

These are the 3 materials that do not accept ink dye sublimation. Therefore, no matter the ratio, a blend of just cotton, rayon, and spandex will not be suitable for sublimation.

Cotton Rayon Blends

Even when evenly distributed, cotton, rayon blends are a no go for sublimation.

You may get an image to transfer, but it will be gone with the first wash.

However, at low heat, this shirt could be a nice fit for vinyl.

Why is Spandex added to Rayon?

Because rayon doesn’t stretch in any direction, spandex must be added to make the fabric more useful.

So it’s good to see fabrics that are rayon and spandex, because shirts that don’t stretch are really hard to put on, and they don’t look good on the body.

Can You Sublimate on Rayon Fabric? 100% or 95% with Spandex

Sublimating onto an all Rayon fabric or even a 95% Rayon and 5% Spandex will likely cause the fabric to melt or at the very least, scorch. That is considered high rayon count and is not a good match for high heats.

Attempting to dye sublimate rayon / spandex fabric will likely end in frustration because of the following:

  • Rayon is not a pure polymer synthetic
  • Rayon is sensitive to irons
  • Rayon’s shiny nature can leave awful press marks

Sublimating Fabrics with High Rayon Count

Most care instructions will advise you turn rayon inside out and use the lowest possible iron setting. That means a 400°F heat press will likely scorch a high rayon count shirt.

Can You Sublimate on a Polyester Rayon Shirt?

A good rule of thumb for dye subbing onto poly/rayon blends is lots of polyester and less than 15% rayon. Those shirts are hard to find and many will also include cotton.

For instance, tri blends that have 25% rayon.

Sublimating 25% Rayon Shirts

Tri Blend Bella Canvas Rayon Shirt (Example)

Some shirts have less rayon and are blended with other materials. While this may help make the shirt a little softer, and shinier, it’s still not great for dye sublimation.

Tri Blends May Not Sublimate

In our experience, when you try to sublimate a Tri Blend Bella Canvas jersey, it won’t look bright. That’s because it has 3 materials: 50% polyester/25% combed ringspun cotton/25% rayon.

The polyester count falls shy of the minimum standard (65%), while the rayon and spandex don’t do any favors.

However, other brands have been able to hold the ink. They look bright and hold for several washes.

Why certain Rayon sublimates and others don’t

We think this discrepancy is because there is no set standard for Rayon. One maker may use more wood pulp than another. Or one may use much more polymer.

That’s why rayon feels like a gamble. Even if you find a good one, new batches of the same brand could press differently the next time.

This has caused much frustration for many sublimators who depend on a shirt, then it changes.

When is Rayon Okay for Sublimation?

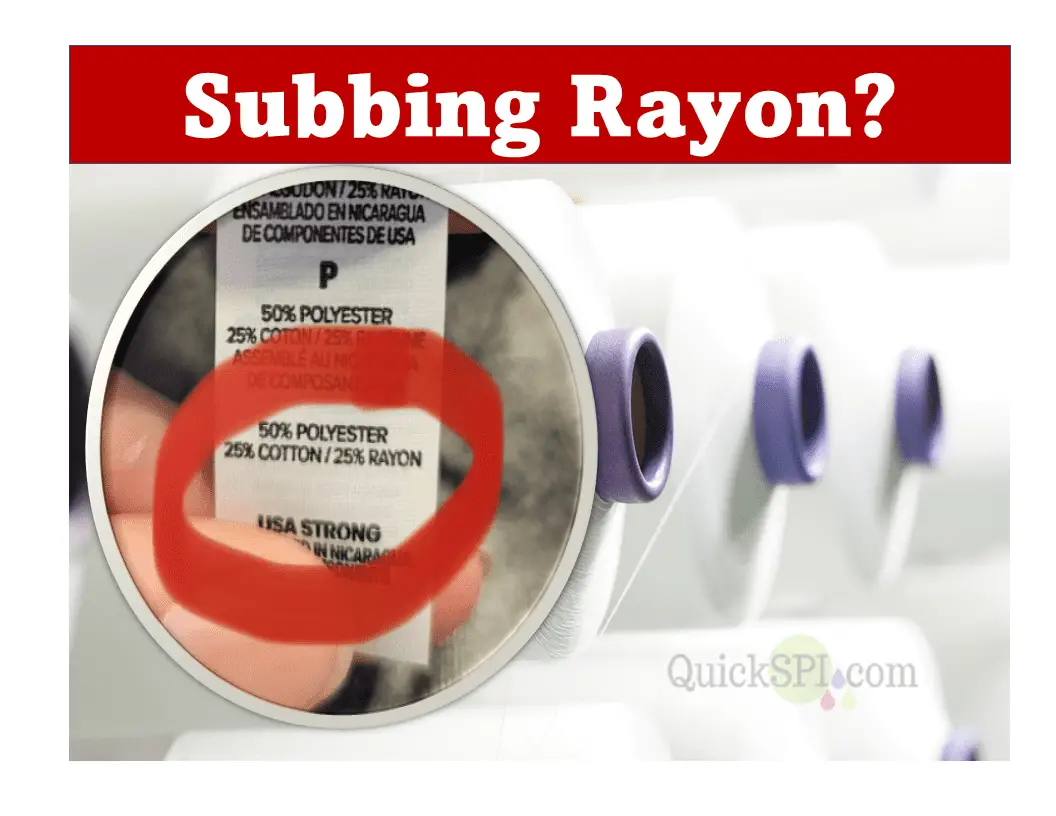
Results vary, but you may be able to transfer a print when the poly count is high and the rayon count is low. For instance, the tag inside the below t-shirt would likely sublimate and accept an ink transfer.

Sublimate tshirt 80% polyester with 10% Rayon 3% Spandex

High Poly, Low Rayon

T Shirts or other fabrics with High Polyester and just a small amount of Rayon and Spandex should accept dye sublimation.

TIP: Turn the Heat Press DOWN to 380°F and Prewash.

Why turn the press down and prewash?

Because these fabrics are often finished with a sizing or coating that could ruin the shirt if exposed to high heat, or impede the sublimation process.

In Conclusion

Rayon is semi-synthetic and it can differ in composition from mfg. to mfg.

Because of this, it could burn, melt, scorch or not work at all.

Every once in a while a low rayon count shirt will come out nice. But, it’s not dependable and therefore, we wouldn’t use it for paying customers without a HUGE disclaimer that it could wash out.

The safer approach is to skip it. No one want to scrape melted rayon of the platen.

Be sure to check out our page that goes over what you can sublimate on

If I buy a New Computer, Will My Sublimation Printer Still Work? The #1 No-No!


hook up new computer to existing printer sublimation firmware

Last week, after sifting through thousands of spammy emails, we finally saw a real question, which we thought was an excellent one.

The question was: “Hey, I just got myself a new mac laptop and I’m afraid of installing the new drivers for my Epson Workforce (7710 or 7720). I’ve always been told NEVER install new software or update firmware or your sublimation days are over!

What should I do? Do I have to keep my old computer for printing?

Let’s answer the above. And we’ll talk about the difference between a Workforce model vs an EcoTank model.

First, let’s be sure you understand the 3 things that make your sublimation printer work in the first place. They are:

  • Drivers
  • Firmware
  • Software

Drivers vs. Firmware vs. Software

Firmware – Printer firmware is the actual program that is installed on the printer at the point of assembly. This program controls how the printer responds to your requests.

Remember all those technical specs you saw before purchasing? Factory installed firmware performs and controls all the functions it promised to deliver.

Software – Software for printers comes in the form of updates to factory installed firmware. Some software improves performance while other software, firmware updates could cause problems.

Drivers – Drivers are not installed at the point of assembly because there is no way of knowing who is buying the printer and what device they’ll be using.

So, drivers get installed by the user onto each computer or device they want to be able to sent print jobs from.

Drivers create the pathways of communication between the user’s devices and the printer.

Setting up a New Computer to Existing Sublimation Printer

When you buy a new computer and want to connect it to an existing, converted sublimation printer that uses ink cartridges, you will need to install drivers on that new computer.

WorkForce Models – Be sure to only install the drivers, and don’t do any firmware or software updates.

That’s because you are using non-Epson ink cartridges filled with sublimation ink. The firmware update could recognize this, and stop the printer from working.

Eco Tank Models – Sublimation printers that use tanks do not have the firmware, update problem.

Why does Epson Update Printer Firmware so Often?

One can only presume that it’s to make their printers operate better. In many cases, firmware updates can patch glitches or problems that have been reported through users who agreed to use the error reporting tool.

However, in doing so, the firmware update could include some code that makes it possible to detect whether or not you are using genuine epson cartridges or 3rd party, which are often cheaper.

Here is a direct quote from Epson User Manual:

“Epson periodically provides firmware updates to address issues of security, performance, minor bug fixes and ensure the printer functions as designed. These updates may affect the functionality of third-party ink. Non-Epson branded or altered Epson cartridges that functioned prior to a firmware update may not continue to function.”

WF-7720 User Manual

Why Use 3rd Party Cartridges for Sublimation

There are only a handful of printers that can be used for sublimation. If you’re using an Epson Workforce for Sublimation, you have no choice but to use 3rd party cartridges that are blank (not filled).

You will buy sublimation ink and pour it into the 3rd party cartridges and then you’ll have a printer capable of sublimation.

For this reason, sublimators with regular printers coverted into sub printers should NEVER update their firmware through a Firmware or Software Update.

Firmware Updates at the Factory -in Same Models

After printers are on the market for awhile, some makers will actually update the firmware going into new printers at the manufacturer, so they do not accept all the cheaper, off brand cartridges that came to market.

In addition, makers will suggest to owners of older models to update their firmware by downloading or allowing automatic updates.

When that happens, the new software that updates the printer’s firmware program, will often result in a your printer no longer being able to read non-genuine ink cartridges.

How to Disable Automatic Firmware Updates: Epson Printer

Epson Software Updater Screenshot of program installation on PC
Screenshot

First, be sure you’ve installed Epson Software Updater Ap. Once installed, follow the screenshots below to permanently disable automatic firmware updates.

I know it sounds counterintuitive to download an application called “Epson software updater” but the app itself doesn’t perform an update.

It simply allows you to schedule updates or turn them off completely (that’s the part we want).

But be careful! Follow the screen shots first thing.

Don’t download the app if you’re not going take the next 2 tiny steps. Otherwise it may be set to update automatically.

The steps are super easy and can be understood by these screenshots below:

Step 1

Step 1 Screenshot - Disable firmware on Epson Printer
Step 1 – Click “Auto Update Settings”

Step 2

Step 2 Screenshot - Disable firmware on Epson Printer
Step 2 – Select “NEVER”

Be sure to click OK, then go back in and make sure it stuck.

Other Ways to Turn Off Firmware

Some printers allow you to enable or disable software firmware updates on the actual printer itself.

For good measure, you should disable updates this way as well, that way you will have created 2 ways to stop automatic firmware updates.

To see if it’s available, open your print preferences and click on the maintenance tab. If you see a software update option, make sure it is set to NOT ALLOW auto updates.

Note: you will need drivers installed in order to see many options in the print preferences. So don’t look for this setting until your drivers are installed.

Here is a video you can watch about installing drivers from epson website. You will select the right drivers for your new computer at the epson website.

Conclusion

When you buy a new computer and want to hook it up to an old sublimation printer you’ll have to take some steps.

While drivers are necessary to install, updating firmware could be disastrous if you are using off-brand ink cartridges.

Many firmware updates include a patch that recognizes 3rd party computer chips that are attached to the ink cartridge.

This can cause your printer to no longer work.

EcoTank models do not have the firmware update issue.

For more information, head back to our homepage.

Happy Sublimating!

What Can I make with a 5 in 1 Heat Press?


what can i make with 5 in 1 heat press

Even though 5 in 1 heat presses or “multifunction” heat presses have been around for a while, they’ve only been gaining traction in the last year or so. In fact, up until about late 2019, you couldn’t even find these machines on websites like amazon.

But that’s all changed and now there are several varieties and of course, all different price ranges that regrettably add to the confusion of what you can do with these helpful, space saving, multi function machines.

So, here goes our best attempt at an explanation of what you can do with the typical 5 in 1 heat press:

With a 5 in 1 Heat Press, you can make Fabric items such as: T-Shirts, Bibs, Flags, & Mousepads. Plus, 11-15 oz Coffee Mugs, Small & Large Latte Mugs, Espresso Mugs, Baseball Hats, Visors, as well as Small & Large Plates. Most crafters get creative with all 5 attachments and can make so much more than what’s listed above.

Now…every once in awhile, you’ll find a 5 in 1 heat press with different attachments instead of the standard listed above. We’ll go over that as we get into the components of a 5 in 1 heat press so you know which attachments to use for each product and how they work.

Also, we’ll go over the difference between a 5 in 1 heat press and an 8 in 1, in case you’re interested in tumblers or water bottles. Then we’ll talk about some specialty, attachments that could be an incredible way for you to rake in some dough from untapped niches.

Let’s dive in…

Short on time? here is a snapshot of our thoughts:

Best for Small Budget : 5 in 1 try one of these (link to products)

For quality and business growth we like this company (link to products)

What Attachments Come with a 5 in 1 Heat Press

Most manufacturers include the following as part of the 5 in 1 offering:

  • 1 top plate (shirts)
  • 1 Mug Element (11-15oz)
  • 1 Hat Press
  • 2 Plate Elements (Small/Large)

Other Uses for the 5 in 1 Heat Press Plate Attachment

Many sublimators do not make custom plates, but those round heat presses for the plates do come in handy for other projects.

Many people use them for logo shirts, because it avoids the dreaded “square or rectangle” press. They are also great for ornaments, coasters and anything small and solid. The greatest benefit being that you don’t have to heat up the whole room with the heat press, and the heat is focused right onto the the object.

So, the plate attachments are handy items to have, even if you have no desire to sublimate plates.

Other Uses for the 5 in 1 Hat Press Attachment

Hat presses sure did come in handy when masks took over the world. Using a hat press was a really nice fit for the inside of curved masks with a high trim.

We also use the hat press for sleeve work on t-shirts, cheer bows and head bands.

Essentially, anytime you can accomplish the same results with a smaller press that uses less power, we go for it.

5 in 1 Heat Press vs. 8 in 1 Heat Press

For the most part, an 8 in 1 Heat Press will have all the same attachment as a 5 in 1 Heat Press. The Additional 3 Attachments are typically: 2 Latte Mug elements, these are the cone shaped cups, plus 1 Espresso cup Element.

Occasionally, a maker might include a label maker instead of an Espresso element. So be sure to read each product offering carefully.

Here is an example offering

This 8 in 1 Heat Press Includes:

  • 15″ x 15″ Heating Element
  • Cap/Hat Heating Element
  • 5″ Ceramic Plate Heating Element
  • 6″ Ceramic Plate Heating Element
  • Standard 11 oz. Mug/Cup Heating Element
  • Espresso Mug/Cup Heating Element
  • Medium Tapered Mug/Cup Heating Element for Latte Mugs
  • Large Tapered Mug/Cup Heating Element for Latte Mugs

Now those cone shaped presses can be used for just about any tapered drinkware. Also, the espresso element can be used for oversized shot glasses. Pretty neat!

For those of you looking to do full wrap coffee mugs. Full wrap meaning, you want your design to go handle to handle, not just a centered logo please pay attention to the shape of your 15oz coffee mugs.

Sublimating 11oz Coffee Mugs vs. 15oz Coffee Mugs

Be advised that the attachment for the 11oz and 15oz is often the same attachment. So it’s really important that you get 15oz coffee mugs that are TALLER than the 11oz mugs and not actually WIDER.

If you get the wider 15oz coffee mugs, there might be too much white space near the handles.

Still, we have been known to make it work, but it requires 2 presses, moving the mug in between.

Do They Make 20oz Tumbler Presses?

What about tumbler presses? Does the 5 in one or 8 in 1 come with a tumbler attachment? So far, we haven’t seen them but I wouldn’t be surprised if someone starts including a tumbler attachment in their multi attachment press.

However, you can usually buy a separate tumbler attachment and use it with your 5 in 1 or 8 in 1. I recommend sticking with the same manufacturer if you do this.

In other words, if you buy a HPN five in one, then buy a HPN tumbler attachment.

Are Heat Press Attachments Universal?

Your manufacturer usually states whether you can or cannot use other attachments and if there is no indication, call them and ask.

If other attachments are allowed, for the most part, all 4 prong heat press attachments are compatible with 4 prong heating machines. However, be aware that some 5 prong attachments do exist and they would not be compatible with a 4 prong system.

It’s also important to be sure the element you’re looking to buy is rated for the watts that your machine puts out. If your machine putts out more watts then the attachment can handle, don’t risk it. Stick with your line of products to avoid a unsafe setup.

Specialty Heat Press Attachments

Aside from being a catchy phrase, the term “the riches are in the niches” couldn’t be truer. While everyone in the sublimating world competes for the same tumbler customer. Why not explore the less popular niches and start making some serious “hush” money? Hush money as in….shhh…it’s a secret.

Here are just a few niche markets that aren’t thoroughly saturated:

  • Flasks
  • Shot glasses
  • Slates
  • Car flags

To check out flask attachment pricing, click here or the shot glass attachment click here

Where is the best place to get a 5 in 1 or 8 in 1 Heat Press?

When it comes to price, there are 2 ways to approach the pricing variables and we’ll offer our years of experience as a way of guiding you through the decision. In the end, there isn’t a wrong choice, just sometimes there are different outcomes for the choices

Cheapest Route

5 in 1 try one of these (link to products)

8 in 1 deals (link to products)

Quality, Tech Support Route

For quality components with excellent support we like these (link to products)

Is a Cheap Multifunction Heat Press Worth It?

Most pros have learned that cheap machinery is more likely to cause cheap looking results. We’ve been there, done that and that’s why you’ll seldom see a pro trying to find the cheapest “anything”

But, we were all once beginners, just scraping by, testing the waters, and trying to build a business on breadcrumbs…so we get that.

Here is why pros buy from professional suppliers such as HPN.

  • The machines usually last longer
  • The machines distribute heat more evenly (produce better results)
  • They often feel sturdier
  • Usually at least a 1 yr. warranty with upgrade options
  • Phone Tech Support
  • Machines hold their value for resale

You can watch lots of youtube videos of people comparing their awful 5 in 1 heat press to one that cost more on Heat Press Nation. So, it’s not just us, it’s definitely a trend.

That doesn’t mean it’s impossible to get a quality, no name, multifunction heat presses. I’ve seen some amazing results. I guess the bottom line is “consistency” is not always there. And professional sublimators with a client base need consistency.

At the end of the day, not everyone is a professional sublimator. Many are just looking to make the occasional gift or perhaps just dipping their toe into sublimation. That’s why we’re so lucky that choices even exist! Do what’s best for your situation.

If you’re brand new to sublimating, we encourage you to check our homepage.

Happy Sublimating!

Can You Make Tumblers with Cricut? 20 oz Skinny Sublimation Heat Mug Press Guide


sublimation tumblers inside cricut mug press

Content may include affiliate links to online retailer that qualify us for earnings. If we can find multiple retailers, we may include links to different retailers so you may compare prices.

Sometimes it can feel like tumblers are taking over the world. I mean just a few years ago, they really weren’t all that popular. But today, we sell thousands….yes thousands and I see no signs of slowing demand.

That brings us to a very logical question as we try our best to get these tumblers sublimated as quickly and as perfectly as possible.

So Can You Make Tumblers with a Cricut Mug Press?

Making a sublimation tumbler using a Cricut Mug press can be done. However, it takes extra material, extra work, multiple rotations and you must keep watch the entire time. Tempting as it is, it is not practical; especially when there are 2 other ways to sublimate tumblers in less time and with professional looking results.

do tumblers fit in cricut press
Tumbler in Cricut

So, even though it can be done, results are more likely to be disappointing when trying to sublimate a skinny tumbler in a Cricut Mug Press.

You will have to turn the tumbler around 8 times. Each time, you increase the chances of blurry transfers (ghosting) and you could ruin your machine or burn your fingers. But…still, it can be done. (more on that later).

How We Sublimate Tumblers

To make life easier, we use a dedicated convection oven (product link). By “dedicated” we mean we don’t mix food and sublimation fumes.

Heat press for tumblers with tumbler inside
Our Tumbler Press

We also use an actual tumbler press (like this link). We have the 7-in-1 mug press with tumbler attachment, but the 2-in1 can also be used…especially if you have no desire to do shot glasses or latte mugs.

That being said….WE LOVE OUR CRICUT MUG PRESS! and it has a place in our workshop.

Read on to see why…and yes, we’ll also show you how to do a tumbler if you insist…

Can You use Cricut Mug Press for Sublimation?

Yes and it’s why we love it! With the right mug, the Cricut Mug Press is great for Sublimation Blank Coffee Mugs between 11 and 16oz. In fact, the mug press is perfect for sublimation craft shows because it’s portable and uses a regular outlet.

Can You use other Mugs with Cricut Mug Press?

Cricut brand mugs are high quality and produce high end results. But you can use the Cricut Mug Press to sublimate other mugs as long as those mugs are coated for sublimation. We regularly swap out which mugs we are using based on pricing and supply.

If you find a great deal on sublimation coffee mugs, they will work with the Cricut Mug Press. We do it all the time. One of our favorite online retailers, Heat Press Nation Link to Sublimation Mugs offers mugs compatible with Cricut mug press

What about Regular Mugs?

Beware! You cannot use Regular mugs with the Cricut mug press when you are using sublimation inks. Sublimation ink will not transfer to regular mugs, such as those found in the dollar store.

The mugs you buy must be for sublimation. HPN has some of the best prices on their entry level series (link)

How to use Cricut mug press for tumblers

If you’re absolutely convinced that you want to use the Cricut Mug press to sublimate tumblers, here is how it’s done. Remember though, it is not the best way to do tumblers and they take a lot of time.

Plus, the Cricut mug press manual does not support this method and so you take a chance of burns and/or ruining the press with no recourse.

TIP: the tumblers must be straight, not tapered. The Cricut Mug Press only supports straight-walled drinkware.

Step 1 – Insert your ready to sublimate tumbler into mug heat press and push it all the way toward the back as pictured below

tumbler in cricut mug press instructions step 1
Step 1 – Put tumbler toward back

Step 2 – Now you’ll need to insert a wedge so the tumbler pushes against the back wall when closed. The wedge must be clean, free of ink and be able to tolerate high heat. Something like a couple of sublimation car coasters or air freshener blanks might do the trick.

straight skinny in regular mug press Instructions step 2
Step 2 – Wedge for pressure

Step – 3 Close the heat mug press and test to make sure the wedge pushes the tumbler all the way to the back and doesn’t move around. Here is a video clip I did to show you what I mean:

Step 4 – Perform the first press by clamping the mug press closed. When done, rotate 1/4 turn and repeat. Then you’ll have to flip it upside down and repeat the process.

Is Cricut Mug Press Worth it?

When used properly, the Cricut mug press is an incredible little machine. It’s portable, lightweight, easy to clean, takes up the space of a toaster, and the press makes beautiful looking mugs.

You can take this compact mug press to shows, events, vacation, camping, etc., and it won’t feel like it’s in the way. We think it’s worth it and that’s why we have one in every studio. When we have just a couple of orders to fulfill, we turn to the Cricut Mug Press because it’s so easy.

We own several. We say it’s totally worth it and check for the best price at both the Cricut Official site (link) and at the Cricut store (link) on amazon.com

Cricut Mug Press vs. Cricut Mug Press Bundle Options

As of this writing, you have a few standard options when purchasing the Cricut Mug Press:

  • Just the Mug Press
  • Cricut Mug Press Essential Bundle
  • Cricut Mug Press Everything Bundle

If you are a sublimator without a Cricut cutting machine, then the heat press mug alone will serve you well. You don’t need most of items included in the bundle.

Simply use sublimation prints from your printer of choice article (or order prints online).

However, if you have a cutting machine, then you may be interested in in the mug press bundles, especially if they are on sale. Here is a snapshot, direct from the Cricut Official Website of how these 2 bundles compare:

Cricut Mug Press – Essential

Bundled with:

  • Ceramic Mug Blank, White – 12 oz/340 ml (4 ct)
  • Infusible Ink™ Pattern, Pink Limeonade, – 4.5″ x 12″ 
  • Infusible Ink™ Pattern, Purple Watersplash – 4.5″ x 12″ 
  • Infusible Ink™ Markers (1.0), Neons (5 ct)
  • Heat Resistant Tape

*Materials in bundle may be substituted based on availability

Cricut Mug Press Everything

Bundled with:

  • Ceramic Mug Blank, White – 12 oz/340 ml (8 ct)
  • Infusible Ink™ Pattern, Buffalo Check, – 4.5″ x 12″ 
  • Infusible Ink™ Pattern, Green Watercolor – 4.5″ x 12″ 
  • Infusible Ink™ Pattern, Blue Paint Splash – 4.5″ x 12″ 
  • Infusible Ink™, Black – 4.5″ x 12″ 
  • Infusible Ink™, Cherry Red – 4.5″ x 12″ 
  • Infusible Ink™, Ultraviolet – 4.5″ x 12″ 
  • Infusible Ink™ Pens (0.4), Watercolor Splash (5 ct)
  • Infusible Ink™ Markers (1.0), Neons (5 ct)
  • Heat Resistant Tape – 2 ct.

*Materials in bundle may be substituted based on availability. 

you can check out Cricut’s bundle options here: link to bundles. They are great deals if you need all the stuff in the bundle. Definitely worth a look.

Cricut Mug Press Machine Summary

We have a Cricut Mug Press in every location and we find them to be easy to operate. More importantly, they give crisp, professional results that command a top retail price.

Our favorite time to use them is for logos, client samples, on the road or when we just have a few to get out the door.

You won’t be able to do a full wrap mug design, and the design should stop short of the handle by about 3/8’s of an inch on each side.

Here is a picture of about how close you can get to the handle:

distance from handle on cricut mug press
stop sublimation about 3/8″ from handle

The Cricut Mug Press is easy to clean and we overall recommend this heat cup press for sublimation of coffee mugs.

get the best price by shopping around. We recommend checking both the Cricut Official site (link) and at the Cricut store (link) on amazon.com

Thanks for visiting,

Happy Sublimating!

How to Uninstall Cricut Design Space in 4 Steps! And Don’t Do It This Way! SCREENSHOTS


How to Uninstall Cricut Design Space

Whether you don’t use the program or the current version is giving you problems and you want to reinstall, the steps below will teach you two easy ways to uninstall Cricut Design Space (or any program for that matter).

We will also show you how not to uninstall a program file so that you know you’re uninstalling correctly.

Let’s dive in…

Method 1 to Uninstall Cricut Design Space From a Windows Computer

  1. Type the Word Cricut in the Desktop Search Bar
  2. Wait for the icon to Appear in the “Apps” Section – Select: Uninstall
  3. Select Cricut Design Space from the Open Control Panel
  4. Click the Uninstall Button

(See Pictures Below for a visual demonstration)

The process of uninstalling Cricut Design Space will begin after you confirm.

Pictures of How to Uninstall Cricut Design Space

Here are actual Snapshot images of a pretend Uninstall. I went through the motions to demonstrate uninstalling Cricut Design Space and took snapshots of my computer:

Right Way to Uninstall Programs on Windows

More on Uninstalling Apps from the control Panel

Once you click Uninstall, You will be brought to the Control Panel where all of your programs are stored. From here, you can officially uninstall any program.

It’s actually a good time to go through your list of programs and get rid of any that you many not be using, especially if you are removing programs to free up storage space on your computer.

Here is a snapshot:

Deleting Cricut Design Space vs. Uninstalling: How Not to Uninstall Programs

If you think right-clicking on the program icon and choosing delete will uninstall your program, you are not alone. While it may delete the icon from your desktop, the right-click, delete method, leaves the program in tact, on your hard drive.

This does Not Uninstall Programs

If the file is not working and you simply select delete, and then try to reinstall Cricut Design Space, you will encounter problems.

That’s why it’s so important to officially uninstall the program and not just delete the shortcut on the desktop

Here are some other methods that don’t work when attempting to uninstall a program:

  • Right-Click Icon, select “Delete”
  • Highlight Icon, Click Delete on Your Keyboard
  • Highlight Icon, Right-Click, Send To: Recycle Bin
  • Click Icon, Drag to Recycle Bin

All of the above methods get rid of the icon so you no longer see it, but these methods do not actually remove the program from your computer and therefore, does not free up any space or help with a reinstallation.

Alternative Method to Uninstalling Design Space on Your Older Windows Computer

If you have an older windows computer, you may not have all of your apps appear in the search bar with options for uninstalling.

If that is the case, do this instead:

  • Type the words: Control Panel in the bottom left search bar on your computer screen.
  • Click the Control Panel Icon
  • Once inside the Control Panel you should see “Programs” – Click that
  • Scroll until you find Cricut Design Space (or whatever you want to uninstall)
  • Click the Program
  • Click the Uninstall Button
  • Confirm when asked

Summary

Installing, uninstalling and reinstalling programs can improve the performance of glitchy programs. Getting rid of programs you no longer use is a great way to free up computer space for the programs you do use.

Whatever the reason for the uninstall, it’s important to know the difference between deleting an icon and uninstalling a program.

We hope this tutorial with screenshots has helped.

Happy Sublimating!

What is a Cricut Self-Healing Mat? Uses vs. Machine Mat (How they Work)


what is a cricut self-healing mat

Content may include affiliate links to online retailer that qualify us for earnings. If we can find multiple retailers, we may include links to different retailers so you may compare prices.

Cutting mats have come a long way from the stinky pieces of plastic that seemed to trap moisture between the mat and your desk. Anyone else old enough to remember those? Not fun!

And if you didn’t have one of the lightweight mats, you probably had a nice looking acrylic cutting mat….that is “nice” until you made your first cut and scratched the surface.

Enter….today’s cutting mats and the curiously named “self-healing” cutting mats by Cricut!

So What is a Self Healing Mat?

Self-healing mats are used when making cuts using rotary (wheeled) blades, precision hobby knives, and similar. Simply lay your paper or fabric on top of the mat and make the cuts. The self-healing refers to the way the mat material will fill to expand any minor surface cuts that were caused during the cutting process.

Best of all, they are high quality (which you can expect from Cricut), they come in different sizes, and they are extremely affordable and often go on sale. Check Cricut for Sale Pricing (link)

How Does The Mat Heal Itself?

I’m no engineer, but it looks like the material is highly compressed and when you accidentally cut the surface, the material kind of expands to fill the crack.

It doesn’t repair it perfectly smooth all the time, but it heals enough so that your knife doesn’t trip or skip the next time you cut near the scratch. It’s such a great concept that actually works quite well.

What is a Cricut Self Healing Mat Used For?

Aside from being an incredible cutting surface, the Cricut self healig mats can be used for

  • Cutting Surface for Blades
  • Measuring to the inch, half inch, 1/4 inch and 1/8
  • Cutting Angles (Degrees)
  • Desk Cover for Smooth Workspace

Are Cricut Self-Healing Mats for the Cricut Machine?

NO! The self-healing mats are for your workspace environment Use them to cut on top of, or for any reason you like except inside your machine.

Self-healing mats are not the same kind of mat that goes into your Cricut machine. Those are called Machine Mats and come in different “grips” or stickiness. If you need Machine Mats, they also go on sale frequently on the Cricut website (link).

Are Self Healing Mats Double Sided?

Most self healing cutting mats are double sided, and at the time of this writing, Cricut offered all double sided, which means if one side finally gets ruined, you should be able to flip it and start all over.

What’s great is that you can usually choose between have a double sided mat with guides on both sides, or one of the sides could be decorative.

Many people like to have one side with the guides and the other side as “decorative”. Cricut offers both double sided with guides and decorative self-healing mats and you can check supplies here.

If you are just an occasional user of hobby knives, a self healing mat with a decorative side might be nicer in your workspace. But if you cut several times a day, multiple times per week, definitely go for the double sided mats that have the cutting guide on both sides.

This will help you extend your mat life because you’ll have 2 cutting sides.

How do You Clean a Self-Healing Mat

We have always used whatever wipes we had on hand and that has included lysol wipes, baby wipes and windex wipes. We’ve also used just a damp cloth.

The surface is super easy to clean and dry!

However, do know that the surface can be stained with sublimation inks. I accidentally spilled ink on one and it was hard to remove and didn’t completely come off. So, like most materials, they are not Ink Proof…. but what is?

Summary

Hopfully this has helped you understand what a self-healing mat is used for. They are not expensive and they are well worth having around the shop. They come in different sizes for different projects and are not just for cutting.

Though cutting is a great thing to do on them.

Happy Sublimating!