

We love our little Eco Tanks! They are amazing , compact travelers allowing for on the spot customization at trade fairs and craft shows. What we don’t love is the limited print of 8.5″ wide, but that’s why we also have large format options in our arsenal of sublimation (converted) printers.
The reality is, we understand that many (if not most) beginners start their sublimation journey with an entry level Sawgrass or Eco Tank printer that is not capable of printing anything wider that 8.5″ paper (AKA: letter size).
But make no mistake, that doesn’t mean that you have to let go of your dreams of making large design baby blankets, doormats and 4x t-shirts….to name a few. Now….it will take some effort and practice to master the art of printing a design in sections but really, if we can do it…YOU CAN TOO!
If you’ve got a small format printer and your heart is set on bigger products, this printing in sections guide is for you; so let’s get started!
Can You Sublimate in Sections?
Yes! If you want to sublimate a large design but are limited by print size, there are ways to sublimate in sections. For instance, you can split large designs into sections using the “tile or poster” option offered in most design programs. If you don’t have those options, we can show you how to do it in free versions of Adobe Reader or MS Paint.
Let’s go over each of these methods one by one and in this order:
- How to know if your design program prints in sections
- Printing in Tiles Using MS Paint
- Printing in Sections Using Adobe Reader
Can Your Design Program Print a Sublimation Design in Sections?
There are far too many design programs to go over each one individually. But for the most part, whether your design program can or cannot print a larger print across multiple pieces of paper will be determined by your print options screen.
The key words you’ll be looking for in your print options screen are “Tile” or “Poster” or “Mural”
If you see those options in your Printing Options Screen, then you can select the options and then (hopefully) you’ll be given a little preview of how it will look printed across multiple pages.
Simply choose the option you like best. Be aware that sometimes you don’t get an option, the program will just give you the best option and you’ll have no other choice except for the tiling options presented.
Sample Screenshot of Tiling Options for Splitting Prints
For example: Here is an image inside the print options of adobe illustrator PAID design program. You’ll see the “OPTIONS” section has a drop down menu, and one of the choices is “Tile”…

Should I overlap my tiled print? We think so! And especially if you are printing on a printer that leaves a little white margin on each side.
It doesn’t have to be a huge overlap, just a small amount like .02-.05 is enough to work with.
Now if you don’t have a sophisticated design program with these tiling options, let’s review the 2 ways to print sublimation in sections using either your free Adobe Reader or Microsoft Paint.
How to Print a Sublimation Design in Sections Using FREE Microsoft Paint
Even though most newer laptops come with a new version of MS paint called 3D Paint, the basic program is still usually found in the start menu. Thank goodness for that!
That’s because Free MS Paint is one of the last free options for being able to print a large design over multiple pieces of paper.
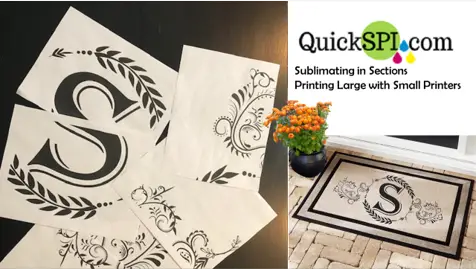
Let’s show you the screen shots. This is a huge design and we want to make a large doormat for a front door using a Home Depot style, traffic master Rug.

You can see that the actual dimensions of the print are 24 inches Wide by 12 Inches High and we are going to print this using our little Eco Tank 2720 (over several pieces of paper). Yes we are!
How to Open a PNG or JPEG in the PAINT Program
If your images normally open in a different program, it’s okay. For most PNG or JPEG files, simply LEFT click onto the image once (without opening the image) until a menu pop ups. From that menu, you should see the option to “OPEN WITH”
Scroll over the “OPEN WITH and you should see an option for Microsoft Paint, we will click that Paint Option and the image should open in Paint. Here is what left click looks like on our .PNG File…

After you select the OPEN WITH option, simply choose MS Paint or just “Paint” program.
Now that your image is inside of the MS Paint Program, let’s get into how we print it out in sections.
To do this, go to File-Print-Page Setup. Here is what that will look like….

Now you will be inside of the Page Setup Options. That’s where the fun begins and where we will look at our options for printing this large design with our small sublimation printer.
Before we get into the options, now is a good time to briefly discuss the pros and cons of tile printing in MS Paint.
The Pros of Printing in Sections Using Microsoft Paint
- You can choose your paper size
- You can choose Landscape or Portrait
- You can build margins
- You can scale it and tile it
- You can choose between center and vertical
The Cons of Printing in Sections Using Microsoft Paint
- Lots of choices can take a while to learn
- The Preview feature is not intuitive or friendly looking
Cons aside, there is way more to like about printing in sections in MS Paint, than there is to complain about, and we have the ultimate tip for making this as easy as possible. Let’s get into the screenshots of the Page Setup options for tile printing our sublimation design.
When you first enter the page setup, you should see the box below. We’ve outlined the most important section with a Red Box. Within the red box, is a green box and that’s what we call the magic button.
Take a moment to look at the screen shot of the page setup screen:

The reason we call it “the magic button” is because after you select your paper size and orientation (portrait or landscape) simply click into the “Adjust to” circle and you’ll see that it automatically understands the FIT we would need to distribute this 24×12 inch image across multiple pieces of paper.
In this case, the size of the paper is Letter and we are asking it to print Landscape mode. You can change those options to suit your needs.
Once we click the “Adjust to Button” MS Paint tells us it’s going to print it across 3 pieces of paper horizontally and 2 pieces vertically. Here is the screen shot AFTER we clicked the “Adjust to Button”

MS Paint knows that the best fit will be performed by printing this print on 6 (3×2=6) pieces of letter size paper.
Now, if you happen to have legal size paper, definitely play around with the paper size and select LEGAL instead of LETTER. This might give you a cleaner distribution of the image. Or it could require less pages, which is usually a good thing if your heat press is large enough to support larger pages.
You can also change the orientation from landscape to portrait and you can center the image using the centering buttons. Play around and use the print preview function to see how each page will look before printing.
That’s how you would print a large sublimation print in MS paint across multiple pieces of paper. If you don’t have MS Paint or a design program that allows you to tile print or poster print, you’re left with trying to print from it as a PDF using Free Adobe Reader.
Let’s get into that..
How to Print Sublimation in Sections Using Adobe Reader Free Version
If you already have a genuine Adobe Reader installed and you know how to save work as a PDF, this will be so easy for you to learn…you’ll wonder what took you so long to print in “poster mode.”
For those of you who know what you are doing, simply import your image into a program that allows you to save the work as a PDF. Once you are done, skip down to the section in this article called “Printing in Poster Mode” in Adobe.
If you are unfamiliar with this, or don’t have Adobe Reader installed, its okay…we’ll cover all of that now.
Free Programs that allow you to SAVE IMAGE or Work AS PDF
So the first step of being able to print sublimation into sections using Adobe Acrobat is to have a program that allows you to save your work as a PDF. If this is brand new to you, it’s very easy to learn.
Here are the top 3 program options we recommend for saving a sublimation design as a PDF so we can break-up our print:
- Power Point
- Microsoft Word – Image must be smaller than 22 x 22 inches
- Google Slides
There are probably more, but one of these is all you need.
Saving as a PDF – Screenshot
Every program allows you to save your work in different formats, but some allow far more options than others. Here is a screen shot of MS Word and you can see from the FILE Menu, there is an option of “SAVE AS” and when we click that tab, we can see all the options for saving our work.
In this screenshot, you can see that MS Word does allow you to save your work as a PDF.

That’s good news, and if you have MS Word, this might work for you. However Word does have a maximum work space of 22×22 inches. So if your work is larger, it won’t be an option.
In our example, our rug image is 24×12, so Word will NOT work for us this time. We will have to use Power Point or Google Slides to save as PDF and then use the free Adobe Acrobat reader to print our sublimation in pieces.
Saving as PDF using Power Point or Google Slides
We have a love affair with Power Point. We know it’s meant for business presentations, but man we sure do a LOT of designing in this awesome program. But for the purpose of this demonstration, we’ll use Google Slides because every single person can use it for free.
To use google slides, simply go to Google Slides: Free Online Presentations for Personal Use and then be sure to click on “PERSONAL USE”
Then, simply open a blank presentation. Here is that Google Slide screenshot:

Once you are inside of a blank presentation, we have to do 2 things before we upload our design. The 2 things are”
- change the slide size (workspace size)
- make the slide “Blank”
Notice that when we open a blank presentation in google slides, it gives us a small workspace of 10 x 6 and it also puts Title and Subtitle boxes on the slide that we will not use.
Here is what it looks like when you first open a blank presentation in google slides: Screenshot

Let’s get rid of the boxes and change the size of the workspace so our large design will fit before we upload it.
IMPORTANT! Whichever program you use, Word, Power Point or Google Slides. BEFORE inserting your image into the program, open up a “blank presentation” or “blank document” and change the slide size or document size to be a half inch larger than the image you will upload.
How to Change the Slide Size in Google Slides: with Screenshots
Select >FILE, from the Menu and then find and click: PAGE SETUP. A little box will pop up and you’ll open the box to find “CUSTOM” and If you’ve done that successfully, here is what your screen will look like:

Now that you have found the custom settings, this is where you will enter the size of your design PLUS one half inch.
In our case, we are going to setup our page to be 24.5 x 12.5 inches before we upload our 24 x 12 rug image.
If you forget to do this step and upload your image before changing the workspace size, your image will shrink during upload. That’s why we do it BEFORE uploading the image.
Screenshot – Here is what our custom settings look like in preparing to upload our rug image:

Now that our workspace is the right size for our image upload, let’s get rid of those “Title and Subtitle Boxes” that are not going to be used.
Removing Title and Subtitle Boxes in Google Slides: with Screenshots
From the Menu Labels, Choose > LAYOUT and see a box open. Inside that box, you’ll click on “BLANK” and watch those boxes disappear!
Screenshot of LAYOUT MENU

If you’ve done everything right, you should have a blank slide and it should be very large. It may even be so large that the numbers on the ruler are not showing. It’s okay if you cannot see the ruler numbers anymore.
If you are concerned about the size, simply insert a shape, the exact shape of your slide and then check to see the fit. It should prove that your slide is properly sized.
Now let’s upload your large sublimation design so we can save it as a PDF.
Upload your sublimation image into google slides
This step is very easy. From the INSERT Menu, select Image and then choose: UPLOAD FROM COMPUTER. Here is our screenshot:

From there, you have to know where your image file is located and simply follow the path to your image and select it.
If you’ve done this properly, your image is now in the google slide. YAY!! Now let’s transform this into a PDF so we can finally begin the steps of printing in sections!
How to Download or Save Google Slide AS PDF
We are ready to transform our big sublimation design into a PDF and before we do this, let’s just make sure we name it something that makes sense. In our case, we’re going to name RENAME our work from “Untitled” Slide to “OUR BIG S RUG”
Why RENAME our Image?
We do this so we can easily find it on our computer. To rename the slide, it’s so easy. Simply click File>Rename
Now let’s download the PDF to our computer.
Downloading the Google Slide PDF to our Computer
To download the file to your computer as a PDF simply click:
File>Download >> Download as PDF
Download PDF Screenshot

Downloading your image as PDF
Now it’s on our computer. You might have to check your download file if it’s not easily found in your task bar.
Once you find your new PDF, open it up using Adobe Acrobat Reader DC. If you have an older version called Adobe Reader X, this should also be okay. Simply find the PDF, Left Click > Open with >> Adobe Acrobat Reader DC or Adobe Reader X.
Once your new PDF is open, click File, Print and hopefully you see this pop up screen with your printing options. Here is what ours looks like and we want to click on the POSTER tab:

If you do not see the poster tab, go to the Troubleshooting section toward the end of this article.
Printing in Poster Mode in Adobe – Splitting Your Sublimation Prints Across Multiple Pages
Adobe takes a No Frills approach to printing in tiles. You’ll have two options: Portrait Orientation or Landscape Orientation. That’s it. Sometimes, less is more and it turns out to be a very easy way to break up a large sublimation print.
Here we go with the screen shots. This is now screenshots of our rug image opened as a PDF.
After you click on the poster tab, it will show you how it will print your sublimation design in sections and across 6 different pages. In this case, we chose landscape mode, but you can play around and see which you like best.
You can also change the paper size to legal, using the tab labeled “Size”.

Remember Your Sublimation Printer Settings
Now before you go and print your image across several different pieces of paper, remember to go into your print properties and make sure your sublimation settings are what you want.
For example: Mirror, High Speed OFF, etc., If you need help with your sublimation settings, check out our YouTube video below:
When all is said and done, click print and watch your sublimation design print in sections using several pieces of paper.
Then, all you have to do is line them up and press them in stages.
Troubleshooting Printing PDF in Sections
If you do not have the Poster Tab Option in your PDF Viewer then you probably have a knock-off PDF reader.
For instance, here is what a low end PDF reader might look like after you press PRINT. I know this because it was pre-installed on my laptop so I had to download the real Adobe Reader (free).

If this looks familiar, or you simply don’t see the POSTER tab option, you’ll have to follow the steps for installing the real Adobe Acrobat Reader DC on your computer. Do not Worry: It’s free and we will show you how in the next step.
Installing the Free Version of Adobe Acrobat Reader DC
If you do not have Adobe Acrobat Reader DC, or a premium version of another Adobe program such as Illustrator, you’ll need to download the PDF Reader at the official Adobe Site.
Be sure you are at the actual Adobe Site and not installing some generic, look alike version of a PDF reader. There are tons of knock-offs out there that do not have the feature we are looking for in order to print our sublimation in pieces. So be sure to go to: Adobe.com
Not to mention, Adobe doesn’t make this free download well-known. It’s hidden in the support pages between an entire page of applications you have to pay for. So we included screen shots:
Screenshot of Adobe Home Page for free Adobe Reader

Then, Scroll until you find the FREE Acrobat Reader DC. It will just have a “Download Button” and not a “Buy Now” Button. Here is what it looks like:

Once you have it installed, make sure you tell it to use it as your Default PDF Reader. This will be an option during install or toward the end.
Now go back to the section about printing your sublimation print across multiple pages using Adobe!
Conclusion
You can print designs and sublimate in sections.
If you’re working in a desgin program, simply look for tiling options on the print options page.
If you don’t have a design program, you can us MS paint to print in tiles and if you don’t have MS paint, you can print using the Poster feature of the real Adobe Acrobat Reader installation.
In order to print in sections using Adobe, you’ll need to safe your work as a PDF using our free options mentioned above.
Everything is free…at least at the time of this writing.
Happy Sublimating!